Showing posts with label felting. Show all posts

Wednesday, March 16, 2011

*bubble* hoooo....!!

After his run-in with our washing machine - lightly felted, slightly fuzzier, and half an inch smaller!
Just the right size to be a handful of hoot for a 5 year old..

(though the whole household is fighting over guardianship!)

Wednesday, May 19, 2010

my little big boy

my little guy was about to get a whole year older (it happens overnight you know) and so i decided he needed to join in on our first proper family birthday tradition - the felted crowns.

so i started with some wool-
(yes it's pink & purple, it was left over from lexi's so-long-ago Tigger Cardi (look how little she is!), and the only feltable stuff left in my stash!)

some food colouring & vinegar,

and some of this stuff-
and.... ta da!


the butterfly theme was because we inherited a couple of monarch caterpillars a month or so ago from our playgroup, and we've had a constant stream of them to look after ever since! Eli absolutely loves them, and has been finding the process fascinating, so i thought it would be a fitting theme for his crown :-)
i think he likes it!

i was incredibly proud of lexi too, who was inspired by my efforts to make eli a present herself as well! she decided to make him a toy horse, which turned into a unicorn, so i cut the basic shape out of felt (i like minimum 70% wool felt), showed her how to do a whip stitch, and off she went! I did the eyes for her, and threaded her needle, but the rest was all her work, even choosing the colours (it's red on one side, purple on the other ;-) ).

(there was a minor controversy on eli's birthday when she decided she actually wanted it to have a short mane, so hid behind the lounge curtains to give it a haircut without asking first, but really since it was her project she had to be forgiven!)

and of course there was birthday cake... not one of my sleeker efforts to be sure *blush*
but it tasted good & the kids loved it, so i'm happy!

Friday, October 23, 2009

Hidden treasures

Looking for ideas for our spring nature table display, i came across the idea of felt geodes!

so with lexi's help, we picked out some spring-ish colours - various shades of green & assorted blossomy colours-
(we stayed away from whites & yellow/red fleeces because they're more winter-autumn to us)

and taking a little hunk of each we formed our geode like this-

you need-
a little bit of carded wool fleece in various colours (i get most of mine from Forest Folk - it's 20g/1m for $1NZ, and 1m goes a long way when you're not spinning it!)
lots of hot soapy water, the hotter the better, within reason.
more soap, i find liquid soap is the easiest for this
a towel
rubber gloves are nice if you're a bit delicate like me ;-) or if your kids are helping with the felting

-starting with a small tuft of your first colour, form a little ball in your hands, then *very gently* holding it between your palms, dunk it into the hot soapy water... DON'T squeeze!!

- now pretending that it is a tiny fluffy animal of your choice, very very gently start to move it around in your hands, very very gently massaging it between your hands... remember not to crush that poor little baby bunny or whatnot that is in your hands! (the dunking it in hot water is another issue entirely)

- gradually increase the amount of agitation as the fibres begin to knit together.. if the fibres stick to your hands a bit, smear a little soap onto your hands & that should help

- once your first little ball is holding it's shape, dry your hands on the towel & wrap a layer of different coloured fleece around your ball, then repeat the previous process, remembering each time you add new fleece that you have to handle it very very very gently!

- keep repeating, adding more layers until you have a decent size geode-
- once the outer layers are fairly firm you can begin to give the whole thing a good, hard squeeze to compact the fibres throughout the geode, and felt them up thoroughly

- once you are happy that you have a nice firm ball, give it a good rinse under cold water, a gentle squeeze out & pat dry with a towel, then leave to dry for a few days in a warm place, like a hot water cylinder cupboard.
- once you think it should be dry, or just can't wait any longer, chop it in half!! i've heard electric knives do the job, but we don't have one, so i just gradually cut round & round it with my sewing scissors!

ta da!!

(as with any of my tutorials, please let me know if any of it doesn't make sense!)

Thursday, October 15, 2009

my fluffy secret...

ok, so in several previous posts i mentioned a fluffy secret that i was working on.. well this is what it was-a few friends of mine decided it would be fun to have a little spring themed swap - just something little, like that fits in the palm of your hand, and you make one for each person in the group & receive one from everyone too...

and since i had been out planting strawberry plants in the garden, i decided to do a nibble of strawberries for everyone!
some went in woven baskets, others in spring-y bags-
i wet-felted fleece to create the basic shape, then needlefelted them into shape properly & 'garnished' ;-) 15 strawberries in total! now i just need to make some for us too lol..

Monday, September 21, 2009

Project Monday #3

now that i've finished the spring butterfly & matching (sort of) doll dress, it's onto other things!

the red fluff is multiplying & has been seen accompanied by some green fluff-
and i've almost almost almost finished this little something for a friends new baby-
almost.

hopefully tonight.. and then it'll be straight onto a little something different for a friends other baby ;-)

Thursday, August 20, 2009

my big girl....

my little big girl has just started nursery!
(to anyone else it's kindy, but where she is going kindy is for 4-7 year olds)

and naturally that came with a list of requirements!

first- a bag to hold a change of clothes and a piece of fruit to share-
i used this pleated purse pattern (which is much more grown-up looking in the fabrics they have used! and umm with decent interfacing..) & used some denim left over from the kids pants, lined with some rainbow cotton i was gifted ages ago :-)
i mean, steiner kindy -> rainbow fabric, what could be more fitting? ;-)
and it has a pocket inside for all those little mysterious essentials-

i also made a little PUL wetbag to hold clothes in case of accidents/mud! i nicked the concept from the incredible talented leanne, who made wetbags like this ages ago - it has a loop of elastic sewn into one of the seams, which works like a hair-tie, and is much faster & easier than drawstrings or zips!

and finally she needed some indoor shoes, so again, steiner kindy -> felted slippers!
from this-
to this-
heh heh heh... (i want some now!)

so now she's all kitted out & good to go!
(and everything from my stash!)

Tuesday, May 26, 2009

lord of the skies..

my step-son's birthday crown!
when he saw lexi's birthday crown, he immediately asked if he would get one for his birthday, and sure enough he will be..

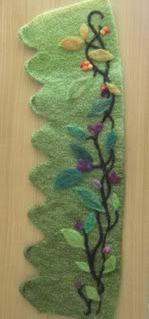
i was trying for a lunar phases sort of idea, but i'm not entirely happy with how it turned out, because i didn't have quite enough space to comfortably fit the gibbous moons (love that word), but it looks slightly empty without them too.. that & the crescents look rather weird in this photo for some reason?!

This crown is created from a piece of wet-felted.. umm.. felt, obviously ;-) (in the two swirly blue colours), which i then needle-felted decorations onto, and added hand-coloured wooden ribbons & silver ribbons for the closure.

The knitted then felted crown definitely makes a sturdier crown shape, but when the time factor is taken into account, plus the versitility of wet-felting with fibre, then i think this is a good option too!

I'm not 100% happy with it, but i'm sure the recipient will be!

Sunday, January 11, 2009

lexi's birthday crown

a while ago i received some very cool 'green tea' wool from the fabulous erin in a themed yarn swap, and i thought it was perfect for a sylvan styled felted crown for lexi's birthday!

the pattern was for 10ply so i adapted it to 8ply & after an age it was finally knitted...

i machine felted it, then needle felted a basic vine design onto it-

i started at one end with spring / new buds kinda thing...
then summer / full flower..
then autumn / setting seeds
and finished it off with some wooden buttons & ribbons

lexi seems pretty happy with it!

Saturday, August 30, 2008

Promise is...

A rainbow heap of roving..and the promise of mischief with said roving..

Wednesday, August 13, 2008

felted crown pt2

well this has definitely been a learning process for me, having never felted a knitted item before.. and i still haven't!

lesson one-
before commencing knitting check that your yarn is NOT machine washable!
checkheaton country 12ply is, for future reference, machine washable.

lesson two-
you know the great debate over whether food colouring is a suitably permanent dye for wool? well if you go all gung-ho trying to felt machine washable wool, then the food colouring will fade a bit.. not terribly, but a bit.

lesson three-
if only a few rows into to-be-felted project you suspect that it would be faster & easier to create it from roving, then it definitely would be.

on the upside, despite machine washing it on hot 3 times, putting it through the drier 5 times (in with other washing, i'm not crazy), trying to hand felt it 3 times, and microwaving it for 8 minutes on high before dumping it back in the drier in a last ditch attempt, the yarn is still extremely frogable. No idea what i'll make with 100g of flame coloured pre-shrunk 12ply tho!?!

Monday, August 11, 2008

felted crown pt1

well over the weekend i didn't manage to get any balls or mushrooms knitted.. but i did get the to-be-felted crown done!

i quite like the flame-y effect that i got from my wool, but it turns out that at my gauge, on 6mm needles, CO24sts & inc10sts, 100g of cleckheaton country 12ply is 8 rows short. doh. oh well, just adds to the handcrafted appeal i guess ;-)


it's now in the washing machine (hopefully) felting up nicely, the next step is to shape it properly before it dries, then i'm going to sew some elastic joining it up, in a casing of red felt left over from xmas stockings :-) i'm undecided as to whether i'll decorate it further.. any ideas?!

we also spent the weekend with five cute chicks..
awww!!

Thursday, August 07, 2008

wool goodness

i've been getting at my wool stash again, some i've dyed for a special yarn swap, which i will post pics of once it has been sent, but i also wanted a nice little project to knit this weekend while we're travelling..

so i decided on a felted crown (rav link) and last night dyed up this-
it's 100g of 12ply cleckheaton country, dyed with red & yellow wiltons icing gels..

i'm also going to be taking materials for balls, more balls and some mushrooms (all rav links) with me just in case!

Sunday, July 20, 2008

winter felt

for our nature table..

Saturday, July 05, 2008

<10 minute crafts!

ahhh i love this sort of thing! little projects that take next to no time, and next to no skill! ;)
but they still give you that wonderful feeling of accomplishment...

so this evening i grabbed a few minutes to try making a felt ball..
dead simple -
-take some carded wool fleece (roving?) like people use to spin yarn, and gently pluck bits of it off (keep your hands a wee way apart to avoid tearing the fibres)
-make a tiny ball out of one piece, then start randomly wrapping more pieces around forming a bigger ball shape..
-keep going until your ball is around 1/3rd bigger than you want the finished one to be
- take some coloured 100% handwash wool, and wrap it tightly around your fleece ball in all different directions, trying to keep a round shape, but don't fret if it looks a bit off..

now the *magical* part..
- take a bowl of hot water (the hotter the better! use rubber gloves if you're a softie like me) with a squidge of liquid soap or dishwashing liquid in it, and very gently dunk your wool ball into it, be warned, it'll probably shrink up quite a bit immediately!
- now you very gently start patting the ball, trying to keep it nice & round, gently squeezing it so that the fibres start to bind together..
- keep working at it, gradually getting stronger & stronger, maybe starting to roll it around in your hands.. you can keep dunking it in the hot water if it starts to cool..
- keep going until it starts to firm up quite a bit, maybe give it a good blast under a cold tap (see why the process does what is called 'shocking' the wool?! lol), keep rolling & squeezing and dunking it in the hot water, until you have a tight, firm, but still slightly squishy, felt ball!
-give it a rinse & squeeze in some fresh cold water, then let it dry out.. (it'll take a while to dry entirely, but that doesn't mean you can't play with it! ;-) )

long-winded instructions, but it really is very fast! :-D
and best of all you get a one-of-a-kind, all natural, cool little ball to play with!

note to self - this one used roughly 15cm of natural wool from Forest Folk, plus some Wool Co 'Blues', came out approx. the size of a golf ball, started about 1cm bigger all around.. :-)

edited to add better pic..

Thursday, July 03, 2008

alexis' art!

inspired by the new Steiner playgroup that we go to, alexis has taken a new interest in doing arty stuff! :-)

We've been doing quite a bit of painting recently, and when i saw some little canvases on special i thought it would be fun to let her loose on them!
this is the first completed one of the three, i really like it, especially how she has added the dots of pink over the 'arms' of blue.. the other two are still WIPs, but will hopefully add pics of them soon too..
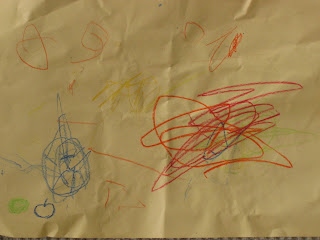
and this is one her many drawings, this one was done at playgroup, using their beautiful beeswax block crayons (they are SO nice to use! ), can you guess what she has drawn in the top left corner?
it's a face! two swirly eyes, a little dot nose and a line for a mouth.. she was naming them as she drew them, so it's not just proud-delusional-mother-syndrome ;-)
(yes, i drew the blue apple in the bottom corner, by request..)

and thanks to this idea by Kleas i thought it would be fun to give her a go at felting!
this is her wee effort-

cute huh? and the zip-lock bag idea works nicely, and keeps all the mess contained!

unlike my effort, which was done sans ziplock bag, and resulted in a pile of soaking wet towels!
we were using autumn colours for the first of our four pieces for our (not yet established) seasonal nature table :-)

huge thanks to mrs Designer Bums for teaching me how to wet felt, with copious amounts of help from the lovely J13 & K9!