Showing posts with label tutorials. Show all posts

Thursday, October 06, 2011

Baby food.

Our youngest girl is at that stage where she is wanting more variety & textures in her food, and eating quite large amounts, but our meals aren't really suitable for her yet.

We're vegetarians, we eat a lot of mexican food which can be a tad spicy for a bubba, and also because of our eldest's allergies we stay clear of the common allergenic foods for approximately the first year. When she was little that tended to mean that we often relied on the limited ranges of meat/egg/dairy/wheat free baby foods available around here, but those were often the most basic mush & quite expensive when she eats a lot!

So our solution is as follows... 

She is way beyond 'the icecube stage', so we went for a roasting pan instead!

What we should have done first is to line the pan with baking paper. Turns out cooked rice sticks really well to roasting pans.

I cooked a whole heap of rice, gluten-free pasta, and red lentils (rinse these first!), to slightly past al dente, and spread them over the bottom of the pan.

Then I steamed a bunch of carrots & cauliflower, just using what we had on hand, and spread them over the previous layer -

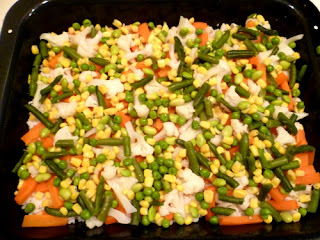
Then same again with green beans, peas, corn & endamame -

Chucked the whole thing in the freezer, then when it was frozen I tipped it all out (ok, gouged it all out), broke it up, and popped it into little one or two portion containers!
The little containers live in the freezer, and just before her dinnertime I lift one out to defrost (doesn't take long), mix some pureed vegetables through it as a sauce, warm it up & it's ready to go!

It was a bit of cooking initially, but it makes HEAPS,  and means your bub gets a good variety of foods every time, it's easier than making a little meal from scratch each night, is much cheaper than just using bought baby food (even though we do use the little 4-6m purees mixed in this), and it means you don't have to think about what to feed them if you are having something unsuitable!!

It's worked really nicely for us, so I thought I should share!

Tuesday, March 29, 2011

Knit Geekery - Grafting

I've just finished knitting a scarf/cowl thingy that is essentially a long strip of knitting that needed the two ends joining together to make a loop.

which is just fine if you are using plain stockinette stitch, or at a pinch garter stitch, because you can just use good ol' kitchener stitch...

BUT the scarf/cowl thingy i was knitting had cables, lots of cables in fact, and after much googling i discovered that grafting any kind of rib pattern seemed to be largely in the too hard basket, even plain ol' kitchener stitch seems to land in said basket too!

so i devised my own way to invisibly graft any kind of knit/purl combo, without having to remember any special technique mantras (ie "knit off, purl, purl off, knit" yadda yadda), and without having to risk losing stitches by using provisional cast-ons...
(ok, so someone might have come up with it first, but nowhere that i saw, so meh, here it is again then!)

i'll try to explain-

the easiest way to begin is to start the edge of the project that will need grafting in a contrast waste yarn, knit a few rows in pattern with this waste yarn, then switch to your main yarn & start the pattern properly....

notes
- if you are doing cables like i was, most cables have rows that aren't cabled, just plain k&p.. you want your sewn graft row to replace one of these plain rows, ok?

- you can do this with a provisional cast-on, i did, it's just that when you free the stitches to graft them, you're going to stick them onto a needle & knit a few rows, in pattern, in your waste yarn to guide you through the graft..

when you get to the other side of the graft, switch to another contrast yarn (DON'T cut your working yarn!) & knit a few rows again... feel free to gently drop all the stitches off your needles now ;-)
so now you have two matching edges of knitting, with a few spare rows on either side...

now with a really long tail from where you finished your main knit - i like to leave 4x the width that i'm going to graft - you're going to start following the pattern that your contrast yarns take through the main colour, in this case my scarf is the blue...

so starting on the white edge, i took the yarn down to the red side & through the first stitch, following the direction that the red yarn takes through the first blue stitch, then back up to the white side.. here you can see my needle following the white yarn through a knit stitch-
you keep going from top to bottom following the path of the waste yarn stitches through your main colour stitches, tucking them to the back like they're not there-
it doesn't matter whether the stitch you are grafting is a knit or purl or changing from one to the other, because you are just copying the waste yarn stitches underneath (just like doing duplicate stitch for embroidery, or sewing in your yarn ends!), this pic shows me sewing two purl stitches together-
at first your sewn stitches will be all loose & messy, but don't worry about that, you can fix that later...
once you get to the end of the row you'll have a whole row of faux-stitches, totally out of gauge with your knitting-
you can gently remove your waste yarn knitting from the back now ;-)

starting at the beginning again, you gently pull the yarn through, one stitch at a time, until your sewn stitches more or less match the gauge of your knitting (ie until it just kinda looks right).. here i've done the stitches on the left, but not the right-
once you've tightened all of the stitches, if it looks good, or close enough, go ahead & sew your left-over tail into the wrong side of your knitting!!
ta da!!!!

ok, mine isn't perfect, but that is actually because i stuffed up removing the provisional cast-on, the grafting technique worked fine, and that is why i'd recommend not doing a PCO, just go straight for a waste yarn lead in...

cool huh? give it a go & i reckon you'll find it way easier than the normal method of doing kitchener, AND it works just as well & easily for stockinette, garter, or any kind of rib!!!

feel free to ask questions or let me know if it doesn't make sense!

Thursday, July 01, 2010

Dyeing Three Ways

Paul is directing & organising his school's show later in the year, and we thought it would be good to dye the kids t-shirts as an easy way to differentiate between the groups... so naturally a spot of experimentation was in order ;-)

we needed to document the process so that it can be taught to the other teachers, so i thought i may as well share it here too!

We were using Procion MX fibre reactive dye + soda ash, and playing with Low Water Immersion dyeing, Spray dyeing, and good ol' Tie Dyeing!!

Firstly we divided the cotton shirts into different colours/techniques, weighed them, and noted the details on scraps of paper-

We then took the shirts for tie dyeing & spray dyeing and soaked them in a soda ash solution - 1 cup soda ash per 4L water - for 15+ minutes (15 is the minimum, up to an hour is fine)

meanwhile.... the low water immersion-

the LWI fabric DOESN'T get soaked, but instead you crumple it up so that it looks like a brain, and cram it snuggly into bowls-
then you mix up your dye as per the instructions (i was working with amounts varying from 2.5oz-4oz of dry fabric, so was using between 1/8tsp-1tsp of dye powder!) and pour it over your fabric-
i added more of the blue dye than the purple (cos i was too generous mixing up the blue, as per usual), and you can see the difference in effect with the finished product...

leave to sit for 40min or so (while messing around with other techniques!), then add a cup or so of your soda ash solution prepared above-
you don't need to smoosh it or stir it, just leave to soak for as long as you can stand - apparently 8 hours is the minimum, up to 48 is good, but who has that kind of patience?

then rinse, warm/hot wash, and dry!


you can see the difference between the dye effects here-
the purple had room to spread, and split across the spectrum, so there are reddish-plum areas, and some stretching all the way to pale blue - whereas the blue had more dye to spread throughout the fabric, so just created a gentle mottled look-

now... Spray dyeing-

first you need to cut out a template - it can either be a whole sheet with just the image you want missing, or *just* a shape, to create a silhouette... we used plastic clearfile pockets, but i've seen leaves used which is quite cool too...

(we learnt though that we would have got better results if we had weighed/stuck down our template somehow!)


once your fabric has soaked for a while, wring it out, lay it onto a flat surface (we used the bottom of the bath) - if you don't want the image to bleed through onto the back you'll need to slip a plastic bag or something inside.

lay your template over the top, then lightly spray your pre-mixed dye on!
be sure you cover the whole template, and try to ensure the template is snug against the fabric
leave to set for 8+ hours-
then rinse, warm/hot wash & dry!

ta da!
as i said before, we discovered that we would have got better results if our templates were held down somehow, and the pink was a bit wishy-washy really...
but it's a fun technique, and would be an easy way for older kids to decorate shirts :-)

finally tie dyeing-

you don't have to spend long googling to come up with all sorts of different ways you can tie your fabric, but we were after something a bit like crazy tiger stripes, so after our shirts had soaked, we wrung them out, and just twisted them up & bound them with some polyester sewing thread...

i had read that a common beginners mistake with tie dye is to be too sparing with the dye, so you end up with an entirely white middle, so we popped our tied up shirts into a bowl, then added plenty of dye-
and gave them a good squish-
(yeah my hands were purple for about 5 days - and a whole week later my nails are still quite dark!)

after an hour or so i tipped out the excess dye - but didn't squeeze it at all - then left it to sit for 8+ hours...

then just like the others - rinse, warm/hot wash & dry!
the one on the left was just twisted up, but the right one we concertina wrinkled first *then* twisted.


now as i said before, i went overboard mixing up the blue dye, and we had the bowl of soda ash solution left sitting there.....

soooo i dumped one of paul's manky old white shirts in the soda ash, then 15min later tipped the dye in too.... gave it a stir occasionally, then left it like everything else...

still not the world's most beautiful shirt, but a definite improvement on how it was!!
( i could have tossed 1/2 a cup of salt in to make the colour more even, but didn't)


so there you go, three different ways of dyeing fabric using the same materials!

it was a fun experiment, and we've got a few ideas about how we would improve them in future, but if you've got some plain ol' t-shirts or fabric hanging around, then i really recommend giving them a go!

(i've posted about LWI dyeing before - with multiple colours - here!)

Wednesday, June 30, 2010

Rollin' rollin' rollin'...

On a whim i decided to hunt out some beeswax... and (despite there being no mention on their website) on one of our journeys we popped into a lovely honey shop (with live bee display that our kids love, and all sorts of delicious honey related products - i want to try the honey icecreams!), and whaddaya know, beeswax! i ended up with a huge 600g blob of golden sweet-smelling stuff, but also grabbed some of the wax sheets to have a play with first :-)

it's very easy really to make rolled candles - i softened one end of the sheets first & sealed the wick in to make it easier for the kids to roll, and then it was just a matter of warming them over the heater (or you can use a hairdryer)-
then when it is quite floppy & turns dark and translucent you start to roll!
just slowly, gently, and remembering to try to keep it straight-
then when you get to the end of the sheet, you warm it again & roll it to seal the end!
i then held the end of the candle over the heater, then gently squished it onto a flat surface, to meld the layers together & make it stand up nicely.

ta da!!
and of course you can decorate them using left over scraps, or modeling/decorating wax :-)

so far ours have been used for making 2D shapes & patterns, and as strawberries, oranges, broccoli, water & cake (obviously struggling a bit to think of something purple & edible!), and perhaps eventually they'll be used as candles too!

Tuesday, June 22, 2010

Small amounts, adding up to make a work of art...

(gold star to anyone who can place that quote *without* googling! and if you cheat & google, no it's NOT Streisand!)

So it's only taken me forever, but i finally got round to trying gradient dyeing!

the basic gist is, you unwind your balls of yarn into a skein, then divide the skein into a series of smaller bundles, one after another....(lesson #1 - tie the bundles up with different colour synthetic yarns & write down the order! this way you know what order the bundles go in!)

then following your favourite yarn dyeing technique you pop each bundle into a separate bowl of dye....(lesson #2 - check that the dye IN the pot matches the label on the pot before you make your plan. i thought i had sky blue, seaspray & navy.. turns out the seaspray was ultra violet! luckily i noticed this before i mixed the dye up & adjusted accordingly.
lesson #3 - also check first that you actually have enough bowls or containers for all the different mixes you need!! i was using procion, which doesn't need heat to set, so thankfully they didn't need to be microwave safe)

rinse, then dry your yarn....(lesson #4 - don't tangle it. how you avoid that i don't know though.)

re-skein your yarn...
wind it into a ball....
then knit it up!the pattern i used is the very cute & snuggly Owlie Sleepsack, knit in 12ply it's a quick alternative to a blanket for little bubs.
heh heh.. owls..

(about those various lessons above... i got the bundles for the 3rd & 4th colours mixed up! so the middle should have gone- dark blue, pale purply blue, dark purple, pinky purple, pale pink, but the pale purply blue & dark purple got switched. doh. and they weren't even the colours i was planning for this project in the first place. doh. and tangling speaks for itself really. doh. but i'm very happy with the finished result anyway!!!)

oh yeah, i've now got a little tab up the top for the various tutorials & recipes that i've shared! hopefully they might be of use sometime :)

Tuesday, February 02, 2010

february isn't too late...

for xmas stuff, surely?

just a couple of things that had slipped through the blogging net... first, an Elefante-
pics taken on xmas eve, hence the shocking lighting!

seriously fiddly, but pretty cute, and all from stash!

and a funny little activity i did with the kids, making xmas felt wreaths!
i simply cut some holly, or xmas trees depending on who you ask, out of green felt and marked two holes on each leaf... then the kids threaded some thin elastic through the holes in each leaf once, in from the front then from the back, then through again, forming a loop, this time going from the back first, then in through the front, threading red buttons or felt circles occasionally as they went. if that makes any sense.

some peoples looked slightly more haphazard when worn...
but it was a fun & easy way to keep them happy for a while, and have been a welcome xmassy addition to the dress-up stash!

Friday, October 23, 2009

Hidden treasures

Looking for ideas for our spring nature table display, i came across the idea of felt geodes!

so with lexi's help, we picked out some spring-ish colours - various shades of green & assorted blossomy colours-
(we stayed away from whites & yellow/red fleeces because they're more winter-autumn to us)

and taking a little hunk of each we formed our geode like this-

you need-
a little bit of carded wool fleece in various colours (i get most of mine from Forest Folk - it's 20g/1m for $1NZ, and 1m goes a long way when you're not spinning it!)
lots of hot soapy water, the hotter the better, within reason.
more soap, i find liquid soap is the easiest for this
a towel
rubber gloves are nice if you're a bit delicate like me ;-) or if your kids are helping with the felting

-starting with a small tuft of your first colour, form a little ball in your hands, then *very gently* holding it between your palms, dunk it into the hot soapy water... DON'T squeeze!!

- now pretending that it is a tiny fluffy animal of your choice, very very gently start to move it around in your hands, very very gently massaging it between your hands... remember not to crush that poor little baby bunny or whatnot that is in your hands! (the dunking it in hot water is another issue entirely)

- gradually increase the amount of agitation as the fibres begin to knit together.. if the fibres stick to your hands a bit, smear a little soap onto your hands & that should help

- once your first little ball is holding it's shape, dry your hands on the towel & wrap a layer of different coloured fleece around your ball, then repeat the previous process, remembering each time you add new fleece that you have to handle it very very very gently!

- keep repeating, adding more layers until you have a decent size geode-
- once the outer layers are fairly firm you can begin to give the whole thing a good, hard squeeze to compact the fibres throughout the geode, and felt them up thoroughly

- once you are happy that you have a nice firm ball, give it a good rinse under cold water, a gentle squeeze out & pat dry with a towel, then leave to dry for a few days in a warm place, like a hot water cylinder cupboard.
- once you think it should be dry, or just can't wait any longer, chop it in half!! i've heard electric knives do the job, but we don't have one, so i just gradually cut round & round it with my sewing scissors!

ta da!!

(as with any of my tutorials, please let me know if any of it doesn't make sense!)